19 tips for nested IF formulas
The IF function is one of the most heavily used functions in Excel. IF is a simple function, and people love IF because it gives them the power to make Excel respond as information is entered in a spreadsheet. With IF, you can bring your spreadsheet to life.
But one IF often leads to another, and once you combine more than a couple IFs, your formulas can start to look like little Frankensteins :)
Are nested IFs evil? Are they sometimes necessary? What are the alternatives?
Read on to learn the answers to these questions and more...
1. Basic IF
Before we talk about nested IF, let's quickly review the basic IF structure:
=IF(test,[true],[false])
The IF function runs a test and performs different actions depending on whether the result is true or false.
Note the square brackets...these mean the arguments are optional. However, you must supply either a value for true, or a value for false.
To illustrate, here we use IF to check scores and calculate "Pass" for scores of at least 65:

=IF(C3>=65,"Pass")
Which can be read like this: if the score in C3 is at least 65, return "Pass".
Note however that if the score is less than 65, IF returns FALSE, since we didn't supply a value if false. To display "Fail" for non-passing scores, we can add "Fail" as the false argument like so:
=IF(C3>=65,"Pass","Fail")

Video: How to build logical formulas.
2. What nesting means
Nesting simply means to combine formulas, one inside the other, so that one formula handles the result of another. For example, here's a formula where the TODAY function is nested inside the MONTH function:
=MONTH(TODAY())
The TODAY function returns the current date inside of the MONTH function. The MONTH function takes that date and returns the current month. Even moderately complex formulas use nesting frequently, so you'll see nesting everywhere in more complex formulas.
3. A simple nested IF
A nested IF is just two more IF statements in a formula, where one IF statement appears inside the other.
To illustrate, below I've extended the original pass/fail formula above to handle "incomplete" results by adding an IF function, and nesting one IF inside the other:

=IF(C3="","Incomplete",IF(C3>=65,"Pass","Fail"))
The outer IF runs first and tests to see if C3 is blank. If so, outer IF returns "Incomplete", and the inner IF never runs.
If the score is not blank, the outer IF returns FALSE, and the original IF function is run.
Learn nested IFs with clear, concise video training.
4. A nested IF for scales
You'll often see nested IFs set up to handle "scales"...for example, to assign grades, shipping costs, tax rates, or other values that vary on a scale with a numerical input. As long as there aren't too many levels in the scale, nested IFs work fine here, but you must keep the formula organized, or it becomes difficult to read.
The trick is to decide a direction (high to low, or low to high), then structure the conditions accordingly. For example, to assign grades in a "low to high" order, we can represent the solution needed in the following table. Note there is no condition for "A", because once we've run through all the other conditions, we know the score must be greater than 95, and therefore an "A".
| Score | Grade | Condition |
| 0-63 | F | <64 |
| 64-72 | D | <73 |
| 73-84 | C | <85 |
| 85-94 | B | <95 |
| 95-100 | A |
With the conditions clearly understood, we can enter the first IF statement:
=IF(C5<64,"F")
This takes care of "F". Now, to handle "D", we need to add another condition:
=IF(C5<64,"F",IF(C5<73,"D"))
Note that I simply dropped another IF into the first IF for the "false" result. To extend the formula to handle "C", we repeat the process:
=IF(C5<64,"F",IF(C5<73,"D",IF(C5<85,"C")))
We continue on this way until we reach the last grade. Then, instead of adding another IF, just add the final grade for false.
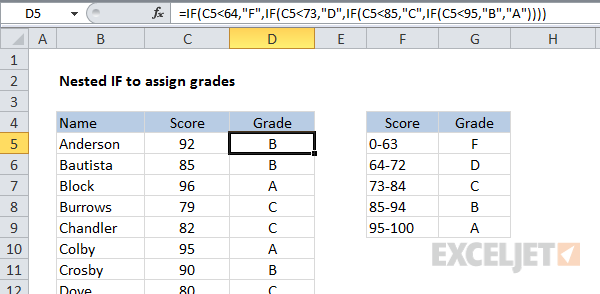
=IF(C5<64,"F",IF(C5<73,"D",IF(C5<85,"C",IF(C5<95,"B","A"))))
Here is the final nested IF formula in action:

Video: How to make a nested IF to assign grades
5. Nested IFs have a logical flow
Many formulas are solved from the inside out, because "inner" functions or expressions must be solved first for the rest of the formula to continue.
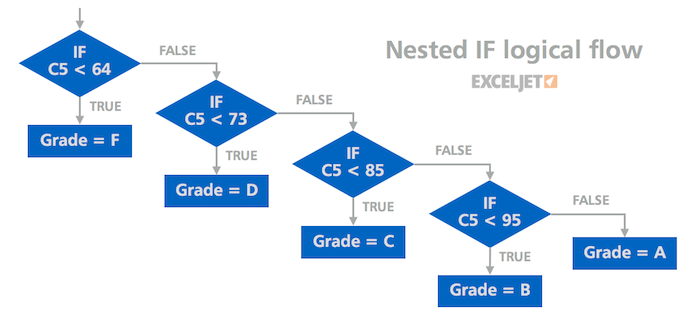
Nested IFs have a their own logical flow, since the "outer" IFs act like a gateway to "inner" IFs. This means that results from outer IFs determine whether inner IFs even run. The diagram below visualized the logical flow of the grade formula above.

6. Use Evaluate to watch the logical flow
On Windows, you can use the Evaluate feature to watch Excel solve your formulas, step-by-step. This is a great way to "see" the logical flow of more complex formulas, and to troubleshoot when things aren't working as you expect. The screen below shows the Evaluate window open and ready to go. Each time you click the Evaluate button, the "next step" in the formula is solved. You can find Evaluate on the Formulas tab of the ribbon (Alt M, V).

Unfortunately, the Mac version of Excel doesn't contain the Evaluate feature, but you can still use the F9 trick below.
7. Use F9 to spot check results
When you select an expression in the formula bar and press the F9 key, Excel solves just the part selected. This is a powerful way to confirm what a formula is really doing . In the screen below, I am using the screen tip windows to select different parts of the formula, then clicking F9 to see that part solved:

Use Control + Z (Command + Z) on a Mac to undo F9. You can also press Esc to exit the formula editor without any changes.
Video: How to debug a formula with F9
8. Know your limits
Excel has limits on how deeply you can nest IF functions. Up to Excel 2007, Excel allowed up to 7 levels of nested IFs. In Excel 2007+, Excel allows up to 64 levels.
However, just because you can nest a lot of IFs, it doesn't mean you should. Every additional level you add makes the formula more difficult to understand and troubleshoot. If you find yourself working with a nested IF more than a few levels deep, you should probably take a different approach — see the below for alternatives.
9. Match parentheses like a pro
One of the challenges with nested IFs is matching or "balancing" parentheses. When parentheses aren't matched correctly, your formula is broken. Luckily, E xcel provides a couple tools to help you make sure parentheses are "balanced" while editing formulas.
First, once you have more than one set of parentheses, the parentheses are color-coded so that opening parentheses match closing parentheses. These colors are pretty darn hard to see, but they are there if you look closely:

Second (and better) when you close a parentheses, Excel will briefly bold the matching pair. You can also click into the formula and use the arrow key to move through parentheses, and Excel will briefly bold both parentheses when there is a matching pair. If there is no match, you'll see no bolding.
Unfortunately, the bolding is a Windows-only feature. If you're using Excel on a Mac to edit complex formulas, it sometimes makes sense to copy and paste the formula into a good text editor (Text Wrangler is free and excellent) to get better parentheses matching tools. Text Wrangler will flash when parentheses are matched, and you can use Command + B to select all text contained by parentheses. You can paste the formula back into Excel after you've straightened things out.
10. Use the screen tip window to navigate and select
When it comes to navigating and editing nested IFs, the function screen tip is your best friend. With it, you can navigate and precisely select all arguments in a nested IF:

You can see me use the screen tip window a lot in this video: How to build a nested IF.
11. Take care with text and numbers
Just as a quick reminder, when working with the IF function, take care that you a properly matching numbers and text. I often see formulas IF like this:
=IF(A1="100","Pass","Fail")
Is the test score in A1 really text and not a number? No? Then don't use quotes around the number. Otherwise, the logical test will return FALSE even when the value is a passing score, because "100" is not the same as 100. If the test score is numeric, use this:
=IF(A1=100,"Pass","Fail")
12. Add line breaks make nested IFs easy to read
When you're working with a formula that contains many levels of nested IFs, it can be tricky to keep things straight. Because Excel doesn't care about "white space" in formulas (i.e. extra spaces or line breaks), you can greatly improve the readability of nested ifs by adding line breaks.
For example, the screen below shows a nested IF that calculates a commission rate based on a sales number. Here you can see the typical nested IF structure, which is hard to decipher:

However, if I add line breaks before each "value if false", the logic of the formula jumps out clearly. Plus, the formula is easier to edit:

You can add line breaks on Windows with Alt + Enter, on a Mac, use Control + Option + Return.
Video: How to make a nested IF easier to read.
13. Limit IFs with AND and OR
Nested IFs are powerful, but they become complicated quickly as you add more levels. One way to avoid more levels is to use IF in combination with the AND and OR functions. These functions return a simple TRUE/FALSE result that works perfectly inside IF, so you can use them to extend the logic of a single IF.
For example, in the problem below, we want to put an "x" in column D to mark rows where the color is "red" and the size is "small".

We could write the formula with two nested IFs like this:
=IF(B6="red",IF(C6="small","x",""),"")
However, by replacing the test with the AND function, we can simplify the formula:
=IF(AND(B6="red",C6="small"),"x","")
In the same way, we can easily extend this formula with the OR function to check for red OR blue AND small:
=IF(AND(OR(B4="red",B4="blue"),C4="small"),"x","")
All of this could be done with nested IFs, but the formula would rapidly become more complex.
Video: IF this OR that
14. Replace Nested IFs with VLOOKUP
When a nested IF is simply assigning values based on a single input, it can be easily replaced with the VLOOKUP function. For example, this nested IF assigns numbers to five different colors:
=IF(E3="red",100,IF(E3="blue",200,IF(E3="green",300,IF(E3="orange",400,500))))
We can easily replace it with this (much simpler) VLOOKUP:
=VLOOKUP(E3,B3:C7,2,0)

As a bonus, VLOOKUP keeps values on the worksheet (where they can be easily changed) instead of embedding them in the formula.
Although the formula above uses exact matching, you can easily use VLOOKUP for grades as well.
See also: 23 things to know about VLOOKUP
Video: How to use VLOOKUP
Video: Why VLOOKUP is better than nested IFs
15. Choose CHOOSE
The CHOOSE function can provide an elegant solution when you need to map simple, consecutive numbers (1,2,3, etc.) to arbitrary values.
In the example below, CHOOSE is used to create custom weekday abbreviations:

Sure, you could use a long and complicated nested IF to do the same thing, but please don't :)
16. Use IFS instead of nested IFs
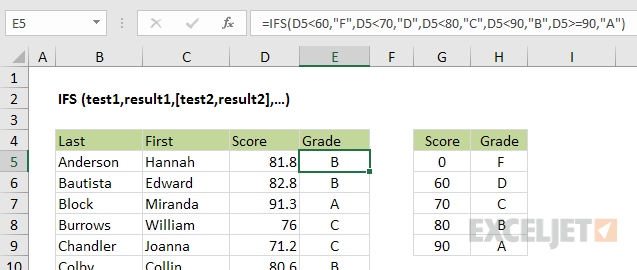
If you're using Excel 2016 via Office 365, there's a new function you can use instead of nested IFs: the IFS function. The IFS function provides a special structure for evaluating multiple conditions without nesting:

The formula used above looks like this:
=IFS(D5<60,"F",D5<70,"D",D5<80,"C",D5<90,"B",D5>=90,"A")
Note we have just a single pair of parentheses!
What happens when you open a spreadsheet that uses the IFS function in an older version of Excel? In Excel 2013 and 2010 (and I believe Excel 2007, but can't test) you'll see "_xlfn." appended to the IFS in the cell. The previously calculated value will still be there, but if something causes the formula to recalculate, you'll see a #NAME error. Microsoft has more information here.
17. Max out
Sometimes, you can use MAX or MIN in a very clever way that avoids an IF statement. For example, suppose you have a calculation that needs to result in a positive number, or zero. In other words, if the calculation returns a negative number, you just want to show zero.
The MAX function gives you a clever way to do this without an IF anywhere in sight:
=MAX(calculation,0)
This technique returns the result of the calculation if positive, and zero otherwise.
I love this construction because its just so simple. See this article for a full write-up.
18. Trap errors with IFERROR
A classic use of IF is to trap errors and supply another result when an error is thrown, like this:
=IF(ISERROR(formula),error_result,formula)
This is ugly and redundant, since same formula goes in twice, and Excel has to calculate the same result twice when there is no error.
In Excel 2007, the IFERROR function was introduced, which lets you trap errors much more elegantly:
=IFERROR(formula,error_result)
Now when the formula throws an error, IFERROR simply returns the value you provide.
19. Use boolean logic
You can also sometimes avoid nested IFs by using what's called "boolean logic". The word boolean refers to TRUE/FALSE values. Although Excel displays the words TRUE and FALSE in cells, internally, Excel treats TRUE as 1, and FALSE as zero. You can use this fact to write clever, and very fast formulas. For example, in the VLOOKUP example above, we have a nested IF formula that looks like this:
=IF(E3="red",100,IF(E3="blue",200,IF(E3="green",300,IF(E3="orange",400,500))))
Using boolean logic, you can rewrite the formula like this:
=(E3="red")*100+(E3="blue")*200+(E3="green")*300+(E3="orange")*400+(E3="purple")*500
Each expression performs a test, and then multiples the outcome of the test by the "value if true". Since tests return either TRUE or FALSE (1 or 0), the FALSE results effectively cancel themselves out the formula.
For numeric results, boolean logic is simple and extremely fast, since there is no branching. On the downside, boolean logic can be be confusing to people who aren't used to seeing it. Still, it's a great technique to know about.
Video: How to use boolean logic in Excel formulas
When do you need a nested IF?
With all these options for avoiding nested IFs, you might wonder when it makes sense to use a nested IF?
I think nested IFs make sense when you need to evaluate several different inputs to make a decision.
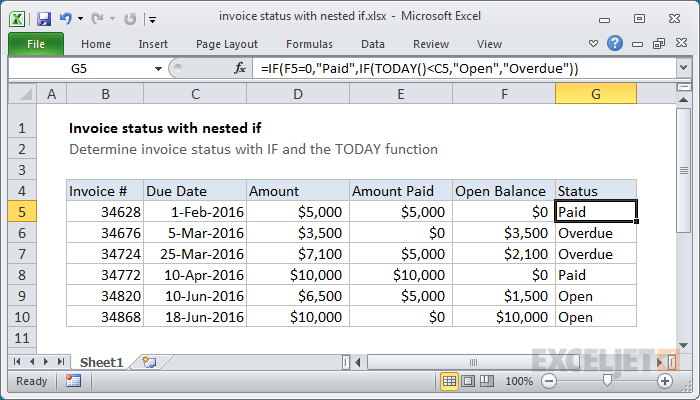
For example, suppose you want to calculate an invoice status of "Paid", "Open", "Overdue", etc. This requires that you look at the invoice age and outstanding balance:

In this case, a nested IF is a perfectly fine solution.
📤How to Download ebooks: https://www.evba.info/2020/02/instructions-for-downloading-documents.html?m=1


Leave a Comment