Protect All Formula Cells in Excel
Protect All Formula Cells in Excel
The use of worksheet protection in Excel is a little strange. Using the steps below, you can quickly protect just the formula cells in your worksheet.
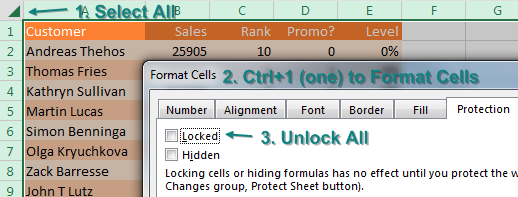
It seems unusual, but all 16 billion cells on a worksheet start out with their Locked property set to True. You need to unlock all of the cells first:
- Select all cells by using the icon above and to the left of cell A1.
- Press Ctrl+1 (that is the number 1) to open the Format Cells dialog.
- In the Format Cells dialog, go to the Protection tab. Uncheck Locked. Click OK.

While all cells are still selected, select Home, Find & Select, Formulas.
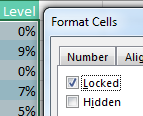
At this point, only the formula cells are selected. Press Ctrl+1 again to display the Format Cells dialog. On the Protection tab, choose Locked to lock all of the formula cells.

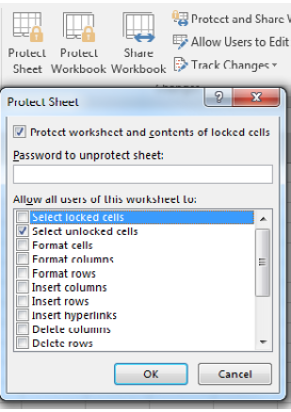
Locking cells does nothing until you protect the worksheet. On the Review tab, choose Protect Sheet. In the Protect Sheet dialog, choose if you want people to be able to select your formula cells or not.
Note
Scroll down a few rows in the Protect Sheet dialog box to reveal popular choices: Use AutoFilter and Use PivotTable & PivotChart. If you want allow people to interact with these features, scroll down and select them.
Caution
Don’t bother putting in a password. Passwords are easily broken and easily lost. You will find yourself paying $39 to the Estonians who sell the Office password-cracking software.

📤You download App EVBA.info installed directly on the latest phone here : https://www.evba.info/p/app-evbainfo-setting-for-your-phone.html?m=1


Leave a Comment